Tin tức
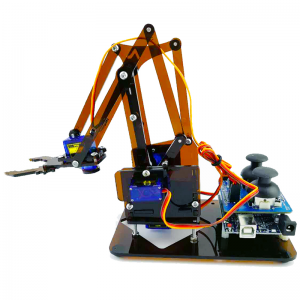
Cách lắp ráp cánh tay robot
<Chú ý>
Sản phẩm mua ở shop đã nạp code sẵn, các bạn chỉ cần lắp theo hướng dẫn
Siết ốc không quá chặt để servo còn quay được và nếu lắp sai còn tháo ra lắp lại dễ dàng
Link mua sản phẩm: https://shopee.vn/product/30050507/22141014399/
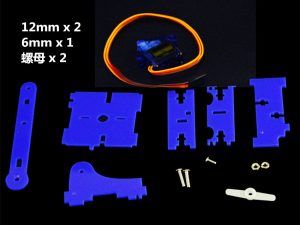
Lắp ráp theo sơ đồ
Các linh kiện sau

(1) 20mm x 4
(2) 12mm x 6
(3) 8mm x 20
(4) 6mm x 17
(5) plastic column x 7
(6) nut x 12
(7) motor x 4
(8) Arduino main board x 1
(9) remote sensing expansion board x 1
(10) silica gel gasket x 1
(11) acrylic components of mechanical arm x 28
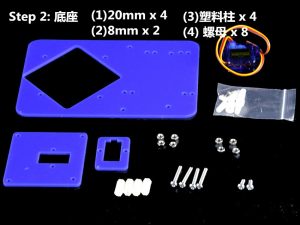
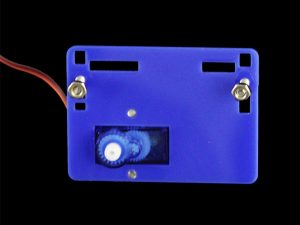
Bước 2 :base
(1)20mm x 4
(2)9mm x 2
(3) plastic column x 4
(4) nut x 8
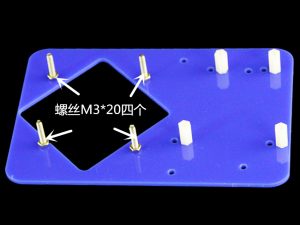
Screw M3*20 four
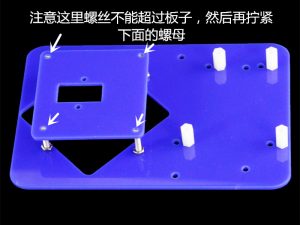
Be careful not to exceed the board, then tighten the nut below.
(Cẩn thận không vượt quá bảng, sau đó siết chặt đai ốc bên dưới.)
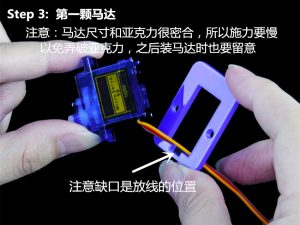
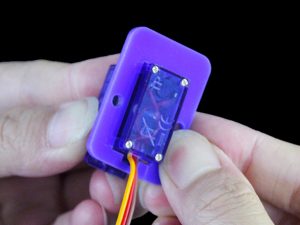
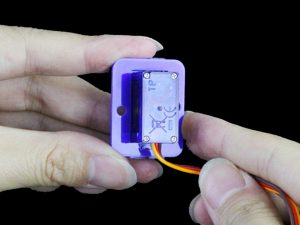
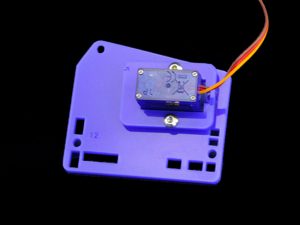
step 3:The first motor
NOTE:The size of the motor is very close to that of the acrylic, so the force must be slow, so as not to break the acrylic.
NOTE:The gap is the location of the line.
(
Bước 3: Động cơ đầu tiên

LƯU Ý: Kích thước của động cơ rất gần với kích thước của acrylic nên lực phải chậm để không làm gãy acrylic.

LƯU Ý: Khoảng trống là vị trí của đường thẳng.
)
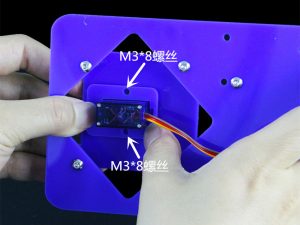
特别提示:木板材质孔会相对偏大,M3*8的螺丝直接锁木板上可能会偏松,建议使用M3*10或者M3*12的螺丝配合M3的螺母进行固定。其他的地方可以不用M3*10的螺丝,相互调整配合下。或者直接加点胶水固定也可以
Special tips: the hole of wood material will be too large, and M3 * 8 screws may be loose on the board directly. It is recommended to use m3 * 10、m3 * 12 screws and M3 nuts for fixation. (exchange with other positions where m3 * 10、m3 * 12 screws are used.)Or just add some glue to fix it
(Lời khuyên đặc biệt: lỗ của vật liệu gỗ sẽ quá lớn và vít M3 * 8 có thể bị lỏng trực tiếp trên bảng. Nên sử dụng vít m3 * 10, m3 * 12 và đai ốc M3 để cố định. (trao đổi với các vị trí khác nơi sử dụng vít m3 * 10, m3 * 12.) Hoặc chỉ cần thêm một ít keo để cố định)Be careful not to tighten the screws too tightly. It will crack the acrylic board too tightly. (Cẩn thận không vặn vít quá chặt vì nó sẽ làm nứt tấm acrylic quá chặt.)
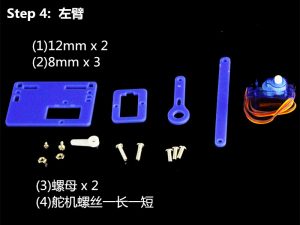
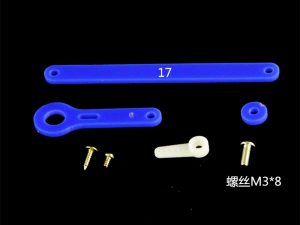
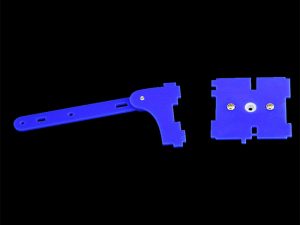
Step 4 :Left arm
(1)12mm x 2
(2)8mm x 3
(3) nut x 2
(4) the screw of the steering gear is one length and one shor
Bước 4: Tay trái
(1)12mm x 2
(2)8 mm x 3
(3) đai ốc x 2
(4) vít của thiết bị lái có một chiều dài và một ngắn

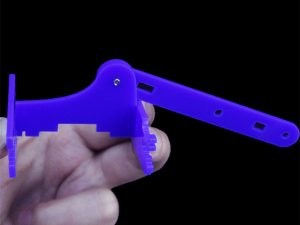
 Screw M3*8
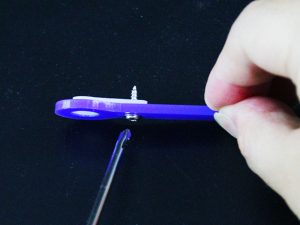
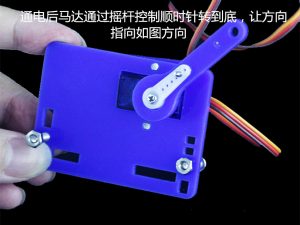
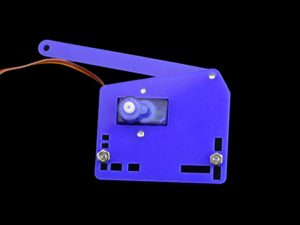
After power on, the motor is controlled by a rocker to turn clockwise to the end, so that the direction is consistent with the picture.
Sau khi bật nguồn, động cơ được điều khiển bởi một rocker để quay theo chiều kim đồng hồ đến hết sao cho hướng phù hợp với hình ảnh.
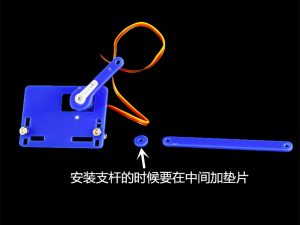
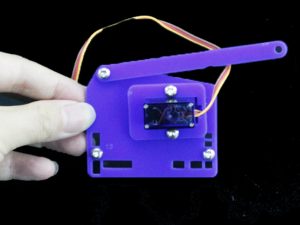
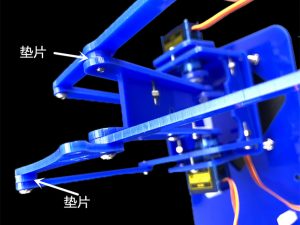
When installing a stick, add a gasket in the middle
Khi lắp thanh cần thêm miếng đệm vào giữa

Yellow to the outside
Power supply 5V 2A charger
Màu vàng ở bên ngoài

Nguồn điện sạc 5V 2A
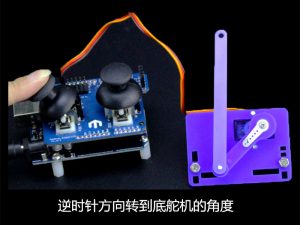 Turn to the rudder counter clockwise
Xoay bánh lái ngược chiều kim đồng hồ


Clockwise steering wheel
Vô lăng theo chiều kim đồng hồ
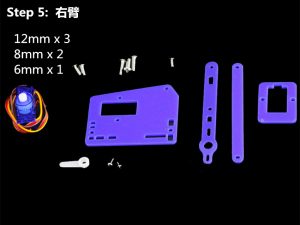
Step 5 :Right arm
12mm X 3
8mm x 2
6mm x 1
Bước 5: Cánh tay phải

12 mm x 3

8 mm x 2

6mm x 1
12mm x 2
6mm x 1
Nut x2
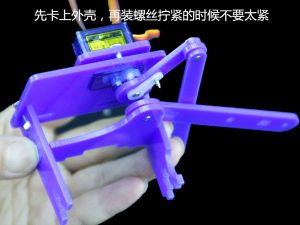
First put on the shell and then install the screws. When tightening, do not tighten too tightly.
Đầu tiên lắp vỏ vào sau đó lắp ốc vít, khi siết không nên siết quá chặt.
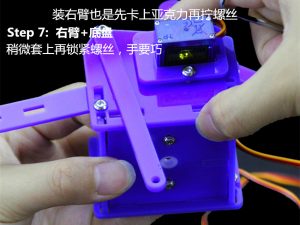
The right arm is put on the shell first and then tightened.
Step 7: right arm + chassis
Tighten the screw and tighten the screw
Tay phải đặt vào vỏ trước rồi mới siết chặt.

Bước 7: Tay phải + khung xe

Siết chặt vít và siết chặt vít

Step 8: intermediate bracket
Screw the nut first
Bước 8: khung trung gian

Vặn đai ốc trước
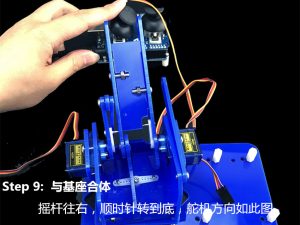
Step 9: complex with the base
The rocker moves to the right, clockwise to the end, and the steering gear is aligned with the picture
Bước 9: phức tạp với cơ sở
Cần gạt di chuyển sang phải theo chiều kim đồng hồ về phía cuối và bánh lái thẳng hàng với hình
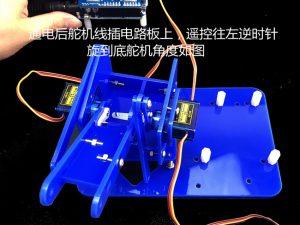
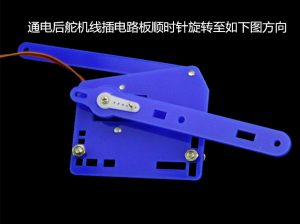
After power on, the rudder line is plugged into the circuit board, and the remote control counterclockwise turns to the end of the steering gear angle and the picture is consistent.
Sau khi bật nguồn, dây bánh lái được cắm vào bảng mạch, điều khiển từ xa ngược chiều kim đồng hồ quay về cuối góc bánh lái và hình ảnh nhất quán.
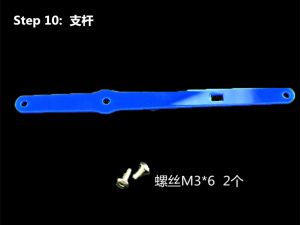
step 10 :Branched rod
Two screw M3*6
bước 10: Thanh phân nhánh

Hai vít M3*6
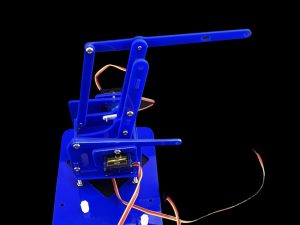
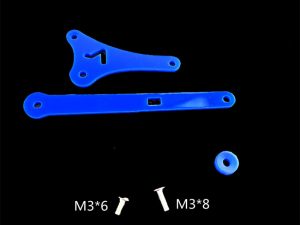
Shim(double)
Shim (gấp đôi)
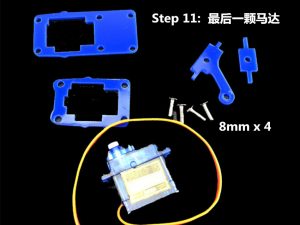
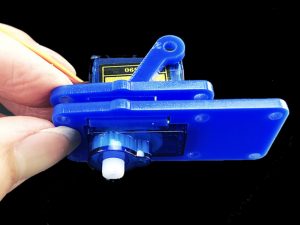
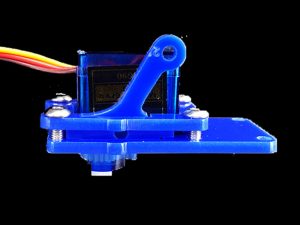
step 11 : The last motor
8mm x4
bước 11: Động cơ cuối cùng

8mmx4
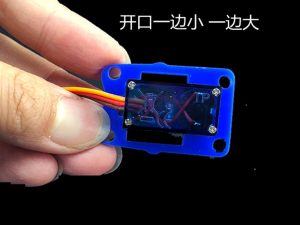
The side of the mouth is large and the side is small.
Bên miệng lớn và bên nhỏ.
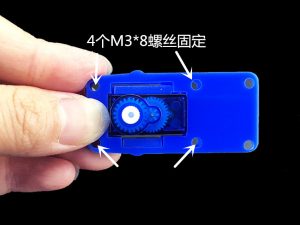
4 M3*8 screws fixed
4 vít M3*8 cố định
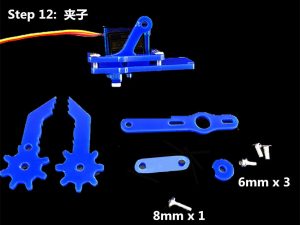
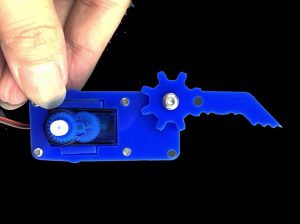
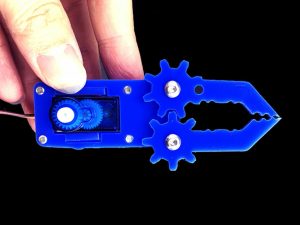
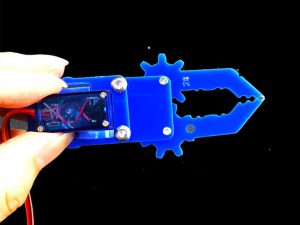
step 12 : clip
6mm x 3
8mm x 1
bước 12: kẹp

6mm x 3

8mm x 1
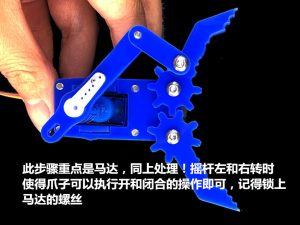
This step is focused on motors, the same way of operation as before. When the rocker turns left or right, the claw can be opened or closed. Finally, remember to lock the motor’s screw.
Bước này tập trung vào động cơ, cách thức hoạt động tương tự như trước, khi cần gạt quay sang trái hoặc phải, càng có thể mở hoặc đóng, cuối cùng nhớ khóa vít của động cơ.
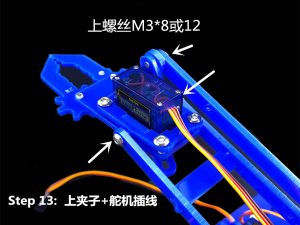
Install screw M8*8 or 12
Step 13: install the clamp, the rudder is connected to the line
Lắp vít M8*8 hoặc 12
Bước 13: Lắp kẹp, nối bánh lái vào dây

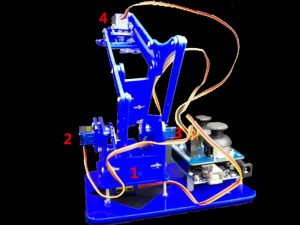
1234 corresponding to the position of the rudder in the next picture.
1234 tương ứng với vị trí bánh lái ở hình tiếp theo.
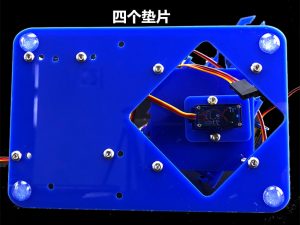
Four gaskets
Bốn miếng đệm
———–Xong—————– ———-Code—————-
Tải từ google drive để không bị lỗi font code: https://drive.google.com/file/d/1gt0ZSPMZAg45oNiXwHTB75L5spCjnred/view?usp=drive_link
Link tải (tải code về nạp, copy lỗi font, code mình đã nạp sẵn nếu mua ở shop mình): Code
#include <Servo.h>
#include <SoftwareSerial.h>
SoftwareSerial mySerial(12, 13); // RX, TX
const int SERVOS = 4;
int PIN[SERVOS], value[SERVOS], currentAngle[SERVOS], MIN[SERVOS], MAX[SERVOS], INITANGLE[SERVOS];
Servo myservo[SERVOS];
int afrom[] = {90, 55, 165}, ato[] = {20, 140, 110}, amiddle[] = {20, 55, 165}, afinal[] = {179,125,95}, aafterfinal[] = {179,55,165};
int DELAYTIME = 200;
int servo_moving[SERVOS] = {0,0,0,0};
boolean stringComplete = false;
int bt_servo = 0;
int bt_move = 0;
int idle = 0;
void setup() {
Serial.begin(9600);
pinMode(3, OUTPUT);
digitalWrite(3, HIGH);
mySerial.begin(9600);
init_Pins();
//auto_mode();
}
void loop() {
move_bt();
move_joy();
}
void init_Pins(){
PIN[0] = 11;
MIN[0] = 0;
MAX[0] = 179;
INITANGLE[0] = 90;
PIN[1] = 10;
MIN[1] = 35;
MAX[1] = 179;
INITANGLE[1] = 90;
PIN[2] = 9;
MIN[2] = 90;
MAX[2] = 179;
INITANGLE[2] = 155;
PIN[3] = 5;
MIN[3] = 0;
MAX[3] = 179;
INITANGLE[3] = 25;
for (int i = 0; i < SERVOS; i++){
myservo[i].attach(PIN[i]);
myservo[i].write(INITANGLE[i]);
value[i] = 0;
idle = 0;
}
}
void move_bt(){
checkSoftSerial();
for (int i = 0; i < SERVOS; i++){
currentAngle[i] = myservo[i].read();
if (servo_moving[i] != 0){
currentAngle[i] += servo_moving[i];
currentAngle[i] = currentAngle[i] > MAX[i] ? –currentAngle[i] : currentAngle[i];
currentAngle[i] = currentAngle[i] < MIN[i] ? ++currentAngle[i] : currentAngle[i];
myservo[i].write(currentAngle[i]);
delay(20);
}
}
}
void checkSoftSerial() {
String str = “”;
if (mySerial.available()){
for (int i = 0 ; i < 2; i++){
str += (char)mySerial.read();
}
// the servo to move
int value = str.toInt();
bt_servo = value / 10;
// the direction to move
int angle = value % 10;
if (angle == 2) bt_move = 1;
else if (angle == 1) bt_move = -1;
else bt_move = 0;
servo_moving[bt_servo] = bt_move;
}
}
void move_joy(){
for (int i = 0; i < SERVOS; i++){
value[i] = analogRead(i);
currentAngle[i] = myservo[i].read();
if (value[i] > 612) {
idle = 0;
if (currentAngle[i] > MIN[i]) –currentAngle[i];
} else if (value[i] < 412) {
idle = 0;
if (currentAngle[i] < MAX[i]) ++currentAngle[i];
} else {
++idle;
}
if (idle == 100){
myservo[i].detach();
}
}
for (int i = 0 ; i < SERVOS; i++){
if (!myservo[i].attached()) myservo[i].attach(PIN[i]);
myservo[i].write(currentAngle[i]);
}
delay(20);
}
void auto_mode(){
for (int i = 0; i < 2; i++){
closeclaw(false);
armfromto(afrom, ato);
closeclaw(true);
delay(DELAYTIME);
armfromto(ato, amiddle);
delay(DELAYTIME);
armfromto(amiddle, afinal);
closeclaw(false);
delay(DELAYTIME);
armfromto(afinal, aafterfinal);
delay(DELAYTIME);
armfromto(aafterfinal, afrom);
delay(DELAYTIME);
}
}
void armfromto(int *arrf, int *arrt){
int lp[3], seg = 3, sign;
for (int i = 0; i < 3; i++){
lp[i] = abs((arrt[i] – arrf[i])/seg);
}
//delay(DALAYTIME);
for (int i = 0; i < 3; i++){
sign = arrt[i] – arrf[i] > 0 ? 1 : -1;
for (int j = 0; j < lp[i]; j++){
myservo[i].write(arrf[i]+j*seg*sign);
delay(20);
}
delay(DELAYTIME);
}
}
void closeclaw(boolean op){
if (op){
myservo[3].write(5);
} else {
myservo[3].write(30);
}
}